Dust Accumulation and Musty Odors
No one should be forced to breathe dirty air. With air being circulated around the cabin of your automobile every time the fan is running (and even when it isn't, to a lesser degree), it doesn't take long before dust accumulates inside your air vents. If left untreated, this can cause respiratory problems as some of the dust is kicked up into your air whenever you run your air conditioning or heat. This is especially worrisome for people who suffer from allergies or asthma. Plus, you may also experience odors in the vehicle due to bacteria caused by condensation.
Best Detailing Products to Clean Your Vents
The good news is that cleaning your vehicle's air vents isn't a very tough job as long as you use the best detailing products that are available to you. Start with a soft, flexible brush that is small enough to fit inside the vents with ease, such as the Wheel Woolie vent brush. The idea is that you want to use a brush that won't scratch plastic or delicate surfaces. Many people will simply wipe out the dust that's collected in the vents, but the trick to cleaning inside them thoroughly is to turn the fan on while you clean. This helps prevent dust from being pushed deeper into the vents as you wipe them out. Also, if the odor in your car is especially repugnant, spray some Lysol, similar disinfectant, or professional odor treatment from an auto parts store into the intake vent or grill and run the air conditioning for a while. This will allow the disinfectant to work through your system and eliminate the odor.
Additional Advice
Here are a few other quick tips to help clean your vehicle's vents:
- For especially tight cracks that a small brush might have difficulty cleaning out, use a cotton swap or toothpick.
- If the vents in your vehicle are removal, take them out and wash them with soap and warm water.
- Due to dust that enters the air while you clean, detail your vents beforeyou vacuum out your vehicle.
In response, many of the key members of einszett, including the lead chemist and his team, have decided to come together to rebirth the company. The founders have come up with a new name to reflect the desire to take einszett to the next level: nextzett.
With help in the form of resources and manufacturing capabilities, the founders are teaming with BHB, a privately held train and commercial vehicle wash plant manufacturer. BHB has been an einszett partner for several years and has the capability to assist in the building of the new company. Manufacturing will return to its roots with production moving back to Germany near the city of Bensberg (Cologne).
We are excited by this new chapter as it means an opportunity to develop new products and improve the current line. The founders of nextzett will maintain the products our customers have come to know and love such as Cockpit Premium, Gummi Pflege, Kristall Klar, Plastic Deep Cleaner, W99, Ultra Gel and Klima-Cleaner while improving on polishes and waxes.
Olde Town Auto Spa will continue to sell einszett products and will introduce nextzett at the start of 2016.
Please refer below to the provided FAQ list.
Questions and Answers:
Who is starting nextzett?
Several of einszett’s long-time employees, including lead chemist, have come together along with einszett partner BHB, a privately owned, premium manufacturer of train and commercial vehicle wash plant systems. The founders will operate and direct the company while BHB provides the resources and manufacturing facilities to produce nextzett products.
Why the name change?
It was important to define the next chapter in the einszett story and to have a name that worked on a global scale. While the company name and logo will change, the product names will not. The names of products like Cockpit Premium, Gummi Pflege, Klima Cleaner, W99 and Kristall Klar will remain as is.
Will the formulas change?
No. The founders of nextzett understand how important this is to einszett customers which is why they are leaving everything intact. With greater resources and a greater knowledge base now at hand, you can expect products to be taken to the next level with improvements and new products added to the range - especially in areas where we have fallen short of expectations.
When will the changes take place?
You will begin to see the nextzett brand name at the start of 2016. In the meantime, we will continue selling einszett branded products.
What kind of changes can we expect to see?
In the immediate future, the only changes you will see is the logo and brand name change. In 2017 and beyond, expect to see a new range of products including new polishes and sealants as well as other products that were not available through einszett
Will there be any supply interruptions?
We have been assured that every effort will be taken to minimize interruptions but we can’t guarantee that. Olde Town Auto Spa will do its part by flying in product when possible to minimize any possible setbacks.
Will there be changes to the packaging?
Not initially, but this may change. Their commitment to producing the best product will always take priority.
]]>A standard product is assigned to each of the four polishing levels – Heavy Cut (Red), Medium Cut (Yellow), Finish (Green) and Protection (Blue). Together these products form the Menzerna standard process, which is considered as recommendation. Numerous application cases are securely covered in practice with this process.
Polishing Program Overview

Alternative and special products are available for each polishing level – to meet the needs of special application cases, or for even greater performance. All Menzerna products are matched to each other so that the interplay works 100 % at all times even when standard products are exchanged.
2015 Product Chart
Menzerna’s many years of experience and close cooperation with the automobile industry and leading coating manufacturers ensure economic efficiency and fast processes. This is where the specialty products, identified by the silver label, truly come into their own. Multiple polishing steps are covered by the latest polishing technologies.
Polishing Program Brochure

Rejuvenator Oil and Pristine Clean Set
- Vacuum the surface of the upholstered piece or interior well or use a soft brush to remove large particles of dirt, paying particular attention to seams, folds, and cracks.
- Apply the Rejuvenator Oil liberally (about 4 oz. per seat) with a Sponge Brush or your hands; massaging the oil well into all the surfaces and natural folds of the leather, this puts natural ingredients, not harsh cleaner, back into the leather and forces out dirt. You may also use a soft sea sponge, or a soft paint type brush. One of our Rolls Royce friends, Chuck Hull of Simi Valley, California suggests a spray bottle, which can be purchased at the local home center. Also apply the Rejuvenator Oil liberally nearer the stitched areas as the conditioner will be able to migrate laterally well into the hide. Park the car in the sun with the windows rolled up to create a “steam room” for as long as practical, several hours or a day. (Allow the oil to be absorbed into the fibrous side of the leather before putting the top down in a convertible.) Direct sun is the worst enemy of any automobile interior or home upholstery. Do not place home or office leather upholstery in direct sun. For “cardboard hard” leather, several applications will be necessary. Patience will be rewarded with good results.
- After the ph correct proteins and collagens from the Rejuvenator Oil have permeated back into the pours and fibres of the leather, strengthening and nourishing them, the surface may be tacky, sticky, gritty, or have a white haze. This is simply the dirt, grime, air pollution, perspiration, salts and other toxins that have floated out of the leather to the surface. Apply Pristine Clean by putting it in a Spray Bottle then wipe off with a SOFT lint free cloth. For tough dirt or vinyl or vinyl tops, brush the cleaner into the grain of the leather or vinyl with a soft bath brush or toothbrush. Let stand for a few minutes, usually by the time you are done with the next piece, and wipe the surface with a soft cloth Your car or upholstered leather piece will appreciate the “face lift” and will have the new leather smell restored. Pristine Clean will not remove the conditioner permeated into the leather. This process may be used on MB Tex vinyl areas to soften and condition. Even flexibility on rubber window trim can be maintained with Pristine Clean.
Leather Facts
We strongly advise against saddle soap, as it has been known to remove the dye from the leather. Avoid products that contain petroleum or mineral oils, as they cause leather fibres to rot prematurely. If your dye is worn away, call about our simple to use Leatherique Leather Dyes. Our cleaner and conditioner have a capillary action. The proteins, cleaners, and conditioners find their way deep into the pores of the leather and force out the dirt, perspiration, air pollution, unnecessary oils, and other toxins that destroy the fibres of the leather, destroying its strength and flexibility, and causing it to deteriorate. For tough, heavier stains, we do make leather cleaner to remove the stain from the surface of the leather. The remainder of the stain will need to be “floated” out of the leather with Rejuvenator Oil. Badly stained surfaces probably need to be re-dyed.
Key Benefits
Leather is conditioned & cleaned safely, easily, and gently. No hard scrubbing or harsh chemicals.
Because there are no petroleum or mineral oil fillers of any type in the Rejuvenator Oil, any residual remains in the fibres, continuing to nourish the leather itself for months. Don’t forget keeping leather healthy and flexible is what extends its life and makes it more beautiful.
This is absolutely “Simply the Best” way to care for your leather, used by museums, collectors, restorers, decorators, and auto enthusiasts World Wide.
Click here for a video of the application process.
]]>
Regular vacuuming and dusting of your car's interior is the best way to keep it looking good. However, surface cleaning alone is not enough. Two to three times a year you will need to detail the upholstery to keep it looking its best. Personally, I like products that leave a nice matte finish or low sheen, but that is personal preference. My favourite detailer is 1z einszett cockpit premium, but I also like the protection in Ultima Interior Guard Plus.
Step 1 Vacuum
First and foremost, you need to regularly vacuum your car’s interior. There's no special trick here, you just need a good vacuum, and make the time to do it.
First, pull out the floor mats and shake them or bang them to remove any loose dirt. Vacuum the mats and set aside, making sure to really scrub the mats with the vacuum nozzle end to loosen any embedded dirt.
Next, start in the rear area of the vehicle. Push the front seats all the way forward, and use the crevice tool to vacuum the cracks of the seats, and between the seats and carpeted area. Now vacuum the rear carpet, and make sure you use the crevice tool to vacuum around the seat tracks and under the front seats and any door panels.
Once done in the rear area, push the front seats all the way back to work on the front upholstery. Use the crevice tool to vacuum the cracks of the seats, between the seats and carpeted areas, and around the gas and brake pedals, and then vacuum the carpet in the foot wells and the seats (if the seats are fabric), the console, vents and door panels.
Step 2 Dashboard and Console
The dashboard and rear deck of a vehicle take the brunt of damage from sun exposure, heat and UV rays. In order to keep your dash from cracking and fading, regular treatment is necessary.
Caring for the dash and console is really pretty easy. Simply wipe them down with a damp microfiber towel every time you wash your car, and treat them with a vinyl protectant once or twice a month. To reduce the effects of the sun's UV rays, use products like 303 aerospace protectant, 1z cockpit premium, or Ultima interior Guard plus which all contain protective UV protectants like sunscreens. These are my personal favorites because they create a nice matte finish. Other glossier products are out there, but they are usually silicone based, and therefore are shinier, and attract dust easily.
Another tip is to use a swiffer duster on the dash and hard to reach areas, but stay away from the pledge and other furniture type cleaners here.
The easiest way to treat the dash and console is to use a foam applicator pad. Always spray your protectant on the applicator, not on the dash or console, and wipe it in thoroughly. This will prevent overspray on your glass and upholstery. Allow the vinyl protectant to soak in for 3 to 5 minutes, and then buff dry to a nice matte finish.
Make sure to also dust and clean out the vents and grillwork. The damp microfiber or swiffer will work great here, but so will a ca of compressed air. If for some reason the plastic or vinyl is heavily soiled, look to a cleaner before the dressing or protectant such as 1z plastic deep cleaner, or ultima interior shampoo.
If your vents are disgustingly dirty, use a cotton swab or foam swab to clean out the dirt. A good vinyl cleaner and protectant works well on a foam swab to clean and beautify vents and speaker grilles.
On consoles with a lot of nooks and crannies, it's best to use a soft bristled brush followed by a towel to clean and protect. This same method works well around buttons and controls on the dash.
Step 3 Door Panels and Jambs
Next move to the door panels. Door panels are often made of several materials, including fabric, vinyl, carpet and leather. Vinyl can be scrubbed to remove shoe scuffs. All Purpose Cleaners (APCs) like 303 Aerospace Cleaner or Ultima Waterless Wash easily remove black scuff marks from these areas.
Thoroughly clean around door handles, pulls and window cranks, using a toothbrush and soapy wash water or for more stubborn stains, APC. Be sure to clean and dry the speaker grilles and the wells on armrests, too. If the door panels have storage pockets, use your sponge or wash mitt to clean in these areas, as they tend to collect a lot of dirt and crud. Next, use your sponge or wash mitt and soapy water to clean all the way around the door frame and the doorsill. When you're finished, dry the door completely with a clean towel, and treat with a spray wax or detail spray such as Duragloss aquawax.
If your door panel is leather or vinyl, be sure to treat it with a leather or vinyl protectant. Fabric door panels can be treated with a fabric protectant, like 303 High Tech Fabric Guard, or CarPro fabric and leather guard to reduce staining and fading.
Step 4 Leather Seats and Trim
The simplest way to prolong the life of your leather interior is to vacuum it regularly. To clean your leather seats and trim, wipe the leather with a soft cloth dampened cloth, or a very soft bristled brush (horsehair brush). Many people have also suggested a 90 per cent water and a 10 per cent woolite mixture, then buff with a clean dry cloth, but I tend to stick to tried and tested leather products such as leatherique and Sonax Leather Foam.
Most leather in cars is a treated or coated leather, and therefore the conditioners in some of the protectants only sits on top of the leather and actually attracts dirt. For me, the damp wipe down usually cleans the seats and trim, but I love having a non greasy dressing on top.
Work the leather protectant into seams, edges and seat backs with a sponge or cleaning cloth, let soak, and buff excess after a few minutes.
Step 5 Detailing Plastic and Vinyl Parts
Spray vinyl, plastic and imitation leather surfaces with 1z einszett cockpit premium or your favorite cleaner. If your cleaner requires rinsing 9if you are using an APC ALWAYS rinse), wash the vinyl and plastic thoroughly with fresh water and a clean microfiber detailing towel.
Next, dry the upholstery with a clean, dry microfiber detailing towel, and allow the vinyl and plastic to dry. Apply your favorite vinyl dressing to restore protection and sheen. I also like to use something called Sonus Total Eclipse...forgot to mention that above. Always look for your dressing to contain UV protection, and I like a mate finish so there is no reflection from the dash onto the windshield when driving on bright sunny days,
One of my favourites is Ultima Interior Guard Plus, and it has the unique characteristic of taking on the original surface finish. So, when applied to a matte finish, Ultima Interior Guard Plus looks flat and applied to a glossy finish, like wood trim, Ultima Interior Guard Plus takes on a high gloss finish.
Step 6 Windows
The interior glass should be the last thing you do to avoid re-contaminating it during the detailing process.
Always work out of the sun and on dry cool windows. The sun can cause glass cleaner to evaporate too quickly and leave residues.
Lightly dampen your microfiber towel with your cleaner of choice. I recommend Wellworth Crystal Glass Cleaner or Sonax Glass cleaner. You want to avoid any cleaners with ammonia like Windex, as ammonia can be harsh on tint.
Spray the cleaner on the window, and wipe up and down and then side to side using long strokes. Flip the towel to a dry side to remove any remaining wetness from the windshield. Do the same on the back window.
Be sure to roll down your side windows about half way so you can clean the top edges of the glass. I like to use a fine nap microfiber for glass, or the stoner’s glass cleaning tool, but many report newsprint as a great medium for cleaning windows.
Step 7 Carpets and floor mats
Most automotive carpets are very durable and will withstand repeated shampooing without signs of damage or wear. Regular vacuuming of carpets is usually enough, but sometimes, you will have to clean stains or spills.
If you don’t have a steam cleaner or extractor at your disposal, one can be rented fairly cheap, or the Bissell mean green machine for 80 bucks at Wal-Mart works great.
Also you could consider spot treating the carpets with a good foaming carpet cleaner such as duragloss Fabric and Carpet Cleaner, or 3m Scotchgard Carpet Cleaner.
Follow these easy steps:
• Spray spots and heavily soiled areas with your cleaner or spot remover
• Fill a bucket with 2 gallons of warm water.
• Lightly spray a section of carpet (no more than 2 square feet at a time) with your carpet and upholstery cleaner. Use an upholstery brush or a sponge in a circular motion to agitate the upholstery. Dip your brush in water to keep it wet, but apply as little water as possible.
• Wipe away the suds with a sponge or a damp detailing towel.
• Empty your bucket of soapy water and refill with clean, warm water.
• Rinse your carpet with clean water by wiping with a damp terry cloth towel. Rinse the soap from your towel often and wring it out. Use as little water as possible, but rinse thoroughly.
• Vacuum your carpet with a shop vac to extract the remaining rinse water.
• Allow the carpet to dry overnight before using.
Once dry, keep your carpet and floor mats looking great, by using use a fabric protectant like 303 High Tech Fabric Guard, or carpro fabric and leather guard.
Well I hate to be the bearer of bad news, but our long Canadian winter is just around the corner, and fall detailing is all about preparing for old man winter, and his cousin, Jack Frost. Right now is the perfect time to prepare your car for the upcoming winter since working in the fall temperatures is quite pleasant! Don’t let caring for your vehicle’s exterior be an afterthought. Snow, ice, sand, salt and other harmful winter elements can shorten the life of your vehicle’s finish if it is not properly prepared and maintained. Winter car care and winter preparation is essential to keep your vehicle protected from snow, ice, and plummeting temperatures. Winter presents some major challenges for your vehicle. Cold temperatures cause rubber seals and tires to become dry and stiff, road salt threatens the paint, and ice clouds your windshield. That is why Olde Town Auto Spa has prepared this detailed guide to Fall Detailing your car for the winter months!
It should go without saying, but before performing Olde Town Auto Spa’s Guide to Fall Detailing, your car should be thoroughly cleaned inside an out. Make sure to remove the leaves and other debris accumulated during the fall under the cowl panel below the windshield and in other areas. The leaves block water drains and collect moisture. This will cause corrosion and extra humidity inside the car, as the air intake for the cabin heater is usually located under the cowl panel. Also make sure to remove all car matts and properly vacuum the interior, leaving it spotless and free from garbage and other debris which seems to build up during the fall months.
Step 1 Paint Protection
It is important to add as much protection as possible to the exterior of your vehicle before the first snowfall to ensure you can fight the damaging effects of road salt. A synthetic paint sealant is usually a better choice than wax in the winter because of the sealant durability. Sealants usually get a bad reputation for not having the same depth and warmth as a carnauba wax, but where a sealant may lack in depth and warmth it more than makes up in durability. Many paint sealants offer great shine, and usually one application will last you all the way through the winter. Compared to a conventional wax, a paint sealant will not need to be re-applied each month to keep a coat on your car at all times. Plus, if you really want that carnauba look, you can always top your paint sealant with a premium grade carnauba such as P21s Carnauba Wax.
There are a few reasons why putting a sealant on your car is especially critical in the winter months. The big one here is road salt. All that salt that gets spread on the ground is great to help road conditions but it wreaks havoc on your paint. It can corrode paint surfaces leading to rust and discoloration.
And that’s not all; all that snow and sleet coming down picks up environmental contaminants on its way down to your car and it just sits there on the paint surface, potentially causing damage. A good paint sealant will prevent these contaminants from ever coming into contact with your paint.
In addition, your paint can really take a beating from the dryness that can occur in the air during the winter. And we’ve already told you what a problem dry paint can be. A paint sealant will protect your paint from dryness and cracking the same way ChapStick will protect your lips.
Olde Town Auto Spa recommends Menzerna Power Lock for winter-tough paint protection. Menzerna Power Lock is the most advanced paint protection product available. Menzerna realized the need for a paint sealant that would perform up to the level of their line of automotive polishes, and Power Lock Polymer Sealant has become the industry standard for the reconditioning-detail market.
Menzerna formulated Power Lock with the maximum concentration of advanced polymers to provide exceptional durability, paint protection and the slickest feel in an easy to apply liquid.
If your not convinced that a paint sealant is the way to go, Olde Town Auto Spa recommends Collinite Liquid Insulator Wax, better known simply as #845. A user-friendlier version of the No. 476s paste, No. 845 stands as Collinite’s most legendary product to date. Famous for its versatility, durability and DIY ease of use, 845 is ideal for both small and large surface area jobs where lasting protection and timely job completion are desired, but hard buffing and frequent reapplication are not practical. Leaves behind carnauba shine and durable coating that preserves finish and shields against the elements; UV, rain, snow, salt, dust, dirt, grime, bugs, staining and more.
Step 2 Windows
We all know how much of a pain snow and sleet can be when you’re driving around because they really reduce your visibility. The best way to avoid this problem is to treat your glass surfaces with a durable glass polish and sealant such as Glass Science Glass Scrub and Rain Clear Windshield Repellant. Glass Scrub deep cleans auto glass safely and effectively without scratching the surface. It removes the buildup of water spots, hard water minerals, oils, insects, road salt, waxes, tree sap, road grime and other stains, and promotes crystal clear glass & clear visibility and driving safety, especially in the sleet and snow.
Advanced Rain Clear gel provides a lasting water, soil & stain repellent coating on all exterior auto glass including windshields, side and rear windows, mirrors & lights for dramatically improved wet weather visibility, safety & driving comfort. Rain, sleet and snow simply "bead" up into small droplets and are swept away by aerodynamic wind flow for a clear view of the road. Rain Clear also dramatically reduces the adhesion & buildup of frost, snow, ice, salt, mud, insects and road grime for easy removal and cleaning. This is a must have combo and a great step to take in the fall before snowstorms start rolling in.
Don’t forget, that cleaning the inside of the windows and windshield are equally as important as prepping the exterior glass for winter. Many of us ignore the interior windows when we wash because it adds a few precious minutes. Driving your car with dirty, hazy windows on a rainy night or in heavy traffic, straining to see is a driving impairment. You should consider this a true danger. In addition to being a hazard, the effects of dirty glass can quickly ruin the appearance of your perfectly polished and waxed automobile. Cleaning your windows is one of the most tedious tasks you will face. After you have completed all other detailing tasks, put the perfect touch on your car by detailing you car’s glass.
Olde Town Auto Spa has the perfect solution to your interior glass cleaning needs, the perfect duo for any window task, Sprayway Glass Cleaner and the Microfiber Madness Cloudbuster Glass Cleaning Towel. Sprayway’s heavy-duty cleaning action, is achieved without ammonia, so it is aftermarket tint safe, and it’s foaming action clings and dries quickly with no residue or streaking, especially when paired with the Microfiber Madness Cloudbuster Glass Cleaning Towel which features a special waffle weave pattern, that utilizes a more aggressive fiber than others to remove stubborn spots, built up grime, and anything else cloudy looking glass might throw at you.
Start your window cleaning with the driver’s door and front passenger door. If your door has a window frame, lower the window approximately one inch to allow access to the top part of the glass. This part should be cleaned and dried first. Spray with glass cleaner and buff dry. Now roll the window back up and clean the remainder of the window. Pay attention to the corner of the windows, as this is where you will get most smears and streaks. Don’t forget your driver’s side and passenger side mirrors.
While you’re sitting down in the passenger’s seat, clean the inside of the windshield. The inside of the windshield is easier to clean from the passenger’s side as your access is not obstructed by the steering wheel. Take your time around the rearview mirror as it is only glued to your windshield. If you bump into the rearview mirror hard enough or at the right angle, you can break it loose from the glass.
The inside of the rear window is the most difficult to reach and should be done last. The best technique for cleaning your rear window is to use the backside of your hand to guide your towel down into the corners, or, Olde Town Auto Spa recommends the Stoner Reach and Clean Tool which helps you clean fingerprints, smudges, smears, fog, smoke film, haze, dust, water spots and more from hard-to-reach surfaces
Step 3 Wheel and Tire Protection
Your wheels present a unique set of challenges in the winter. The most important thing to do here to prepare for the winter is to apply a good wheel sealant. Olde Town Auto Spa recommends either WheelWax, or Collonite 476.
Whether you choose WheelWax because it is safe for all wheels, painted, anodized, polished or clear coated, or Collonite 476’s classic carnauba/polymer blend that olds up month after month against harmful outdoor corrosives such as UV rays, rain, snow, salt, dust, dirt, grime, bugs, and staining either product keep brake dust from adhering to your wheels (important year round), but it will prevent salt, snow, ice, and dirt from causing damage to your expensive wheels.
While there is a great emphasis on protecting our rims from winter’s harsh realities, the tires are often overlooked; your tires also deserve attention, for a slightly different reason. When the temperature outside gets down to freezing levels it’s much more likely that the rubber will dry out and crack, and this is bad. You’ll want to apply a tire conditioner that will penetrate the rubber to hydrate it and prevent cracking. And not only will it prevent damage, but it’ll look great too. (This is also an important step to take on other exterior plastic surfaces such as rubber trim.)
For this purpose, Olde Town Auto Spa recommends the Tuf Shine Tire Appearance Kit. What makes Tuf Shine different than other tire dressings? Tuf Shine contains no oils or silicone that can cause dirt and dust to cling to tires Tuf Shine also seals in factory lubricants and blocks out UV and ozone so tires stay pliable. Another amazing feature is that Tuf Shine Lasts for months and that is why it is highly recommended as part of any Fall Detailing regime. Tuf Shine withstands repeated high-pressure washings and has no sling off! Maintenance is also a breeze, because once the clearcoat is applied, the only maintenance for the winter is achieved by Washing the tires with mild soap and water and a soft car wash brush.
Step 4 Rubber Seals, Weather-stripping, and Windshield Wiper blades
To prevent rubber door seals and weather-stripping from sticking in freezing weather, lubricate them with special conditioner specifically designed for vehicle weather stripping, 1z einszett Gummi Pflege. Gummi Pflege Conditions rubber weather stripping on car doors, windows and trunk lids reducing squeaks, rattles, wind noise and water leaks. Protects and keeps the rubber elastic, restores color to dried out rubber, and protects against extreme temperature and UV rays. Also make sure that when you wash your vehicle during the cold winter months, that you ensure that all seals and weather-stripping is dried properly. If your weather-stripping is not dried properly, once the vehicle is parked and temperatures drop moisture from all these sources may seal and freeze the rubber seal to the metal. If the seal is forced open, the seals may rip or tear causing the vehicle to no longer seal correctly.
Windshield wipers are necessary to clean your windshield and rear window when it rains, snows, becomes bug ridden, or dirty from long road trips. Wipers perform best when the rubber is in good shape and the glass is fairly clean. You should make it a habit to clean your front and rear wiper blades at the same time you clean your glass. Olde Town Auto Spa recommends after cleaning your glass, use 303 Wiper Treatments to wipe the rubber blades, removing bug residue, wax, and other dirt build-up.
303 Wiper Treatments stop annoying chattering, skipping and streaking wipers in seconds. With a quick wipe, 303 Wiper Treatment reconditions hardening rubber blades and makes them glide like new. A penetrating lubricant coats the natural rubber used in wiper blades. Snow and ice will not stick to treated blades and blades will not freeze to the windshield overnight. By reconditioning hardening rubber blades. 303 Wiper Treatment restores lost flexibility and performance. 303 Wiper Treatment keeps wiper blades working like new.
Although rubber dressing helps preserve, protect, and beautify the rubber and vinyl parts on your car, you should not use dressings on your wiper blades. Rubber dressing on your blades will cause streaking and smearing, impairing your vision. The best overall maintenance of your blades is keeping them clean. No amount of cleaning will keep your blades in perfect condition. Wiper blades wear with each use. Most wiper blades will last about one year. When your blades become worn, dried, or faulty replace them with a new set. Olde Town Auto Spa recommends replacing wiper blades at the beginning of fall, when you do your Fall Detailing.
Step 5 Proper Snow Clearing
During winter it is crucially important to minimize contact with your vehicle’s paint. What this means is DO NOT remove snow from your vehicle’s painted surfaces with an ice scrapper or brush whenever possible. Snow and ice removal is a major source of scratches on auto exteriors. Not only minor scratches, but harder to repair RIDS (‘random isolated deep scratches’). This is both from the tools sometimes used, as well as the snow / ice itself. Going about the snow removal in a safe manner could save you heartache in the long run.
When you remove the snow on your vehicle, and you use a nylon brush, you still focus on moving the brush with how air would travel, gently and slowly, using downward motions, starting at the top of the vehicle and moving downwards with each stroke. This ensures you are not introducing dirt from the bottom of the vehicle to the upper portions of the vehicle. Also, do NOT try to remove every last bit of snow. Remove the majority with the brush, and then allow the heat from your engine or power of the sun to remove the remaining last little bit safely. This will help to minimize the amount of contact between the paint and the nylon bristles.
Step 6 Washing in Freezing Temperatures
Winter detailing is all about prevention. Ideally one should clean their vehicle as often as possible to ensure no build-up of road salt on painted surfaces. The longer road salt stays on a vehicles surface, the more time the salt has to eat away at your wax’s protective elements.
Salt is the most common cause of corrosion. With an abundance of this harmful substance on roads, parking lots, and driveways during the winter months, metal components of your vehicle must receive special care. Salt is kicked upwards and underneath your vehicle, where is dries. If it is not removed, the salt will corrode the metal parts underneath your car.
Wash your car more often during winter. Moisture, salt and dirt accumulate inside the wheel wells, under the doors and other hidden areas and cause corrosion. The chrome wheels and other chrome trim parts could be damaged if the vehicle is not washed after driving on the roads when the salt was used. I like washing my car at a self-service coin car wash with the high-pressure gun, as it washes off the dirt and salt from hard to reach areas and from underneath the car.
Whenever possible, when the temperatures bear it, or you are protected from the cold and elements at your local carwash bay, Olde Town Auto Spa recommends a wash with Optimum No-Rinse Wash and Shine or No Rinse Wash and Wax.
Whether you choose No Rinse Wash and Shine, or Wash and Wax, Optimum No-Rinse (ONR) is a must go-to product for winter washing. It does a great job cleaning up paint in any condition, and leaves a slick, shine that can’t be beat! Optimum No Rinse is the most technologically advanced car wash system that only requires 1-2 gallons of water to wash the entire car. No Rinse Wash & Shine does not require rinsing since there are no soapy surfactants to wash off into the storm drains.
This unique product contains substantive polymers which bond to the paint and protect it during the wash. Therefore, No Rinse Wash & Shine offers greater protection and lubricity than conventional car washes leaving a sleek & glossy finish behind afterwards, and gives you the ability to wash anywhere at anytime including washing inside the garage during the cold months, no messy water runoffs, and greater looking car finishes.
And don’t forget the interior. Have your vehicle’s interior vacuumed regularly during winter months. Make sure to have your floor mats replaced or cleaned and treated with a cleaner and conditioner to protect against harmful winter elements and maintain your vehicle’s appearance. This will protect your vehicle’s interior from slush, salt and mud brought in from outdoors.
These are just a few preventative steps which are important to take in the fall. There are certainly other things involved in detailing but these are some of the most important to prepare for winter. We’ll be following up in the following months with tips and tricks for ongoing winter maintenance cleaning and detailing.
With a little preventative maintenance, your vehicle will weather the winter beautifully!
]]>
Step 1 Washing
As far as washing goes, you need to look at it as an entire project. First and foremost, you have to wash the vehicle frequently (once or twice a week) and while doing so, you want to try and limit the amount of contact with the vehicle that will cause scratching or swirls. To do so is pretty easy but you can’t take shortcuts. I recommend the 2 bucket wash method. You can Google it for different variations, but the key is one wash bucket, one rinse bucket and two grit guards. Grit guards will protect your wash media from picking up debris from your wash waster, and the soap will take the debris down to below the guard, minimizing the risk of scratches. Simply hose the vehicle down, and section by section wash the car. Every time you need more soap on your wash medium, rinse your wash medium in the rinse bucket and agitate it against the grit guard. Then back to the wash bucket and on to the vehicle again. Repeat. Also make sure you have a nice soft wash medium like a chenille microfiber wash mitt, or my favourite, a merino wool wash mitt like the one made by CarPro.
If this is a pre polish wash, I recommend using Dawn dish soap...you don’t care if it will strip the wax, because you really want to degrease the paint anyhow...but this should be the only time you use Dawn, unless you are starting this process all over again.
For the maintenance wash, look for some good quality high lubricity car wash soap such as the Sonax Shampoo, Optimum Car Wash, Perls made by 1z, which is great and has a wax in it to aid with drying, or Meguiar’s Car Wash Shampoo and Conditioner which is pretty cheap in the gallon.
Step 2 Decontaminate
Next, I suggest using a product called IronX. This stuff is amazing, but the smell is horrific. It is great at dissolving all iron particles, and other paint contaminants and will really make the claying step easier.
Once prepped with Iron X, now you have to clay the paint. Use a high quality clay bar and clay lube. This is a necessary step to ensure all of the contaminants are off the paint. The last thing you want to do is grind them into the paint and cause more swirls or even worse, scratches.
As like many of the steps, there are many variations of the traditional clay bar, but I would recommend sticking to traditional clay like the one made by clay magic. The speedy prep towel, or nanoskin towel or pad are like clay alternatives, but sometimes are quite aggressive.
Step 3 Remove Swirls/Polish
Once clayed and cleaned, machine polish the paint to remove the swirls. Sometimes if the swirls are bad, they will need a heavier compound, but you should be able to use a good polish like Menzerna SF4500 or Optimum Finish Polish and use more and less aggressive Pads to get the cut and finish you’re looking for on your truck. The Menzerna is really the best for the hard ceramic clear s, but Sonax Nano Polish is also awesome and easy to use!
If the paint is a bit worse, I would suggest either the Menzerna PF 2500 or FG 400 for the swirl and scratch removal and Menzerna SF 4500 for your polish. Equally as good, are the Sonax Profoline Fine Abrasive Paste and the Sonax Profoline Nano Polish. Again, this would be just a preference. Both are high end products made in Germany.
As far as pads go, you will need a couple oranges for the aggressive cutting and either some whites or greens or blues for the polishing (these are Buff and Shine Pads I’m referring to). You need to clean them often, and I suggest a few of each colour because they do get dirty. I suggest 10 pads.
If you’re working by hand, you really won’t be able to get rid of the swirls, but you will def. clean the paint. The best product I’ve used by hand with the best results is hands down Sonax. They have a two step process with a Paint Power Cleaner and step 2, a Hybrid wax. It is a mix of Carnauba wax and synthetic polymers. This will make an outstanding shine and gloss on the vehicle, and a recently released product called Sonax Polymer Net Shield will take the gloss and shine and durability to the next level.
I also like the Duragloss TPP 105 which is also amazing. And I would top that with Aquawax. This is the most affordable solution, best for hand application, but won’t really remove any swirls. These two product lines are more of a chemical cleaner than an abrasive product.
Step 4 Sealant/Wax/Coating
This step can be done either by machine or hand depending on the products chosen. The machine just spreads the wax/sealant out faster and thinner. Remember, thin is in...Do multiple thin coats instead of one thick coat. The residue is hard to remove. But I do not suggest using a machine to spread a coating like cquartz or opti coat.
For a sealant, I highly recommend Menzerna Powerlock. expect to get anywhere from 12 to 18 months protection, and this can be topped with a carnauba wax if so desired to give you more longevity. Use a red pad to apply the sealant or wax if working by machine.
For a permanent coating, I suggest Opti Coat or Cquartz, however, expect 24 moths protection from Cquartz, permanent from Opti Coat. Cquartz is very nice on black.
The surface must be properly prepped for Opti coat to work its best, so I’d also recommend using eraser or prep sol to ensure all the polishing oils are gone, or else you risk the Opti coat not bonding.
Step 5 Maintenance
Once protected, wash the car using the above method as necessary, but using a gentle and highly lubricated shampoo like Sonax Car Shampoo or Optimum Car wash, and look to freshen the paint after washing and drying with a product like Optimum Instant detailer (the only thing I suggest using on top of Opti Coat) or Sonax brilliant shine detailer or AquaWax (my personal favorite).
Also for drying, I recommend using your leaf blower. It is a great way to dry your car...it blows the water out of all the crevices and prevents water spotting, which will etch the paint and bring you back to step 2 very quickly. I would also recommend using a waffle weave towel for the spots left by the leaf blower such as Sonus Drying Towels with one of the drying aids listed above.
My all time every time recommendation is to consider a coating when possible, but I only like to recommend permanent coatings when you have access to a machine polisher. The final finish depends on the prep work, and without a machine, id skip the permanent coating route and just take your time by hand with less permanent option.
]]>
ABSOLUTLEY REMEBER THIS TIP!!!!!
Do not wash the engine unless it is cool.
Preparation
Cover/wrap any electrical component that might get wet while washing with a plastic bag (grocery bag) or saran wrap. Parts to cover include the distributor, alternator, fuse box (optional) and any exposed wiring connectors.
Rinsing
In my opinion, a pressure washer is not needed and will only cause you grief. Using the garden hose, rinse the engine bay using low pressure. Just give a quick rinse of the engine bay, not blasting it, and keeping away from the areas of concern you previously covered. Go over each area of the engine and do not let the water run over the same spot for an extended amount of time. The goal is to just wet the area, and rinse any lose debris off.
Cleaning
Use a good all-purpose cleaner such as Duragloss APC or Meguiar's APC. Simple Green can be used, but it has been reported to etch aluminum....I haven’t seen this happen myself, but others have reported it so be careful.
Spray your favorite APC throughout the engine bay. Let the APC dwell for a few minutes and it will start to break down the oil & grease on its own. Next, grab some various brushes and sponges, (detail brushes, Daytona wheel brushes, tooth brushes etc.) and give the engine a good scrub. Easily accessible areas can be cleaned with the sponge (underside of the hood, valve cover, exposed paint, etc.) The harder to reach and dirtier areas are what the brush is for. It's fine to spray on a little more APC on areas that you need to while scrubbing.
Rinsing
After you have finished scrubbing and the engine is degreased, rinse the engine bay, using low pressure and let the water run over the engine. You can do more scrubbing with the brushes, and even add a bit more APC to areas that you've missed or need a bit more work. Rinse thoroughly.
Drying
Do not air dry the engine. Using some old MF towels, hand dry each part of the engine bay you can reach. Also some compressed air works good here. Just be mindful not blow the water into unwanted electrical areas. Unwrap the electrical components and use one of the more damp towels to wipe them down. Then dry them with another dry towel.
Plastic & Hose Detail
To dress and protect the engine and hoses and other under-the-hood plastic, look to use Sonus Trim and Motor Kote, or another top quality product such as Meguiar's vinyl & rubber dressing or 303 aerospace protectant. I personally like the Sonus Trim and Motor Kote because it has never attracted any dust or dirt.
If working with any product except the Sonus product, spray the dressing directly onto the towel and then wipe down the hoses and other plastic. The Sonus product works a bit differently. Let the dressing dry before driving, and I suggest leaving the hood open in the driveway in the sun for a couple of hours to ensure it is dry.

And that should do it. You will have a perfectly detailed engine bay worthy of any car show!
]]>
Set your mind at ease! There are no worries when it comes to using a Random Orbital Polisher like the G110V2 Dual-Action Car Polisher by Meguiar’s, of damaging your paint, even if you have never used a car polisher before! This machine offers variable speeds and a random orbit dual action for safe, swirl free polishing.
This polisher with the correct pad and polish, is capable of removing random isolated scratches, swirl, oxidation, water spots, acid rain etching and bird dropping damage as well as other unfortunate paint defects that stand in the way of that brilliant shine.
The polisher is also a great maintenance tool for your gloss enhancement polishing, pre-wax cleaning and applying thin, even coats of your favorite car wax, paint sealant or protectant. Even if you have never used any type of car polisher you can still achieve an amazing, swirl free shine.
This article will take you through the process step-by-step.
GETTING STARTED - Dual Action Car Polisher
It's easy to give out advice on what steps to take to make your car look good, but there are many variables that come into play that we need to consider. This guide will lead you through the necessary steps to achieve that sought after, deep, wet looking shine. Now let’s get started!
STEP ONE - SURFACE EVALUATION
You know how you want it to look but you must also take in to consideration the time involved, tools needed and if the damage is severe, your own skill level. Here are a few things you need to think about before you start your surface evaluation process.
- Products and Tools Available
- Time Available
- Work Space Including Lighting Weather Conditions
- Skill Level
- Your Expectations
Now that we know what we have to work with, let’s evaluate the surface of your paint to determine our plan of attack.
Overall Paint Condition- Is your paint new or like new, in need of light polishing for gloss enhancement, requiring minor defect removal or is your paint neglected and needing heavy defect removal?
Paint Hardness -This is difficult to tell until you start polishing your car. Some paints are harder than others making defect removal more difficult so more aggressive products would be needed.
Paint Thickness - This is difficult to tell unless you have a paint thickness gage. Without a gage, what you need to look for is thin spots or any areas that may have been burnt through in the past by inexperienced detailers with the wrong type of buffer. If you find a thin area, stay away from that area with your polisher. You can't polish out thin paint, it just wears it away.
Individual Paint Defect
- Isolated Scratches
- Swirls
- Oxidation
- Paint Etching
- Water Spots
- Paint Staining
- Clarity of overall surface
Now that we know what needs to be corrected we need to choose the proper polish and polishing pad to correct the defects in your paint’s surface and achieve desired results.
STEP TWO - POLISH AND POLISHING PAD SELECTION
Now that you have evaluated the surface and know what needs to be done it’s time to figure out what products you will need to get the job done. Keep in mind you always start with your least aggressive product for the job and step up in aggressiveness only if needed.
Major Defect Removal – Remove Scratches, Oxidation and Other Serious Defects
The yellow Buff and Shine Euro Foam Grip Pad is the first step in serious defect removal such as random isolated scratches, heavy swirl, severe oxidation, stubborn water etching and other difficult to remove paint defects. Use the Buff and Shine Euro Foam Grip Pad for safe and efficient removal of more serious defects with a compound such as the Meguiar’s M105 Ultra Cut Compound.
Minor Defect Removal – Remove Swirls, Light Scratches, Oxidation and Minor Defects
The Orange Buff and Shine Euro Foam Grip Pad is the second step for minor defect removal of swirls, fine isolated scratches, water spots, mild water etching, light oxidation and other less severe paint finish defects. Use the Buff and Shine Euro Foam Grip Pad for safe and competent removal of medium to light common defects with a swirl remover polish such as Menzerna PF2500 Power Finish Polish or Sonax Profiline Fine Abrasive Paste.
Gloss Enhancement and Paint Cleaning – Pre Wax Cleaning and Gloss Enhancement
The green Buff and Shine Foam Grip Pad is your third step in paint perfection and is used to clean your paint and enhance gloss so you can achieve that desired deep, wet looking shine. Use the green Buff and Shine Foam Grip Pad for your pre-wax cleaning and final gloss enhancement as well as to prep your surface for proper bonding of car wax, paint sealant or protectant with a finish polish such as Duragloss 105 Total Performance Polish or Optimum Finish Polish.
Protection Application – Protect your Paint Finish from Harsh Environmental Elements
The red Buff and Shine Foam Grip Pad is the final step to a flawless finish and is used to safely apply your car wax, paint sealant or protectant. Use Sonus SFX-4 Final Gloss Seal and Protect Pad for thin, even application of the Sonus SFX-4 Paint Sealant.
STEP THREE - PAINT POLISHING PROCESS
Now let's start polishing! Remember to never work in direct sunlight or on a hot surface.
Good lighting is also very important so you are able to evaluate your work during the polishing process. Thoroughly wash and dry your car.
- Use a detailing clay to remove bonded surface contamination that is in the way of polishing your paint.
- Choose an area approximately 2' by 2' area on the surface to begin your process. Usually the worst area is your best choice.
- With painter’s tape, tape off any sharp edges and trim to avoid staining trim, build up in cracks and crevices and pad damage.
- Select the proper polish and polishing pad based on your surface evaluation to start your process.
- Adjust your speed setting according to the “Recommended Speed Setting Guide” below.
- Place the pad on the surface of the paint.
- Turn on the power switch. WARNING! Never lift the polisher off the surface of your paint while it is turned on!
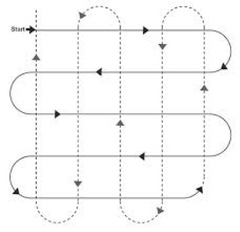
- When removing any type of defects apply medium pressure while polishing and move in SLOW overlapping motions according to the “Recommended Paint Polishing Pattern Guide” below.
- When the polish is worked in well it will start to turn clear.
- At this point turn off the machine and lift it off the surface of the paint.
- With a clean, quality microfiber towel, buff the remaining product residue off the surface of your paint.
- In good lighting, evaluate your work.
- If it looks like you need to work on the defects a little more, add a few more pea size dabs of polish and repeat your process until your evaluation revels success. (Keep in mind when using more aggressive products you need to work your way down in aggressiveness to achieve your best shine.)
- Don’t forget, this is a four-step process but you may not need all for steps.
- Working in sections that are no larger than 2’ by 2’ to concentrate your work repeat the necessary polishing processes over the entire surface of your car until desired results are achieved.
- Remember areas with more serious defects will require more polishing time so be patient and allow the polisher to do its job.
Using your final wax pad, apply your favorite car wax, paint sealant or paint protectant and allow to cure. Remove remaining residue with a clean, quality microfiber towel or buff off using your microfiber bonnets to reveal a brilliant shine!
Maintain your shine by quick detailing when lightly dusty and regular washing as needed with a quality car wash shampoo, wash mitt and microfiber drying towel.
Proper machine polishing is as easy as following this simple pattern and concentrating your work in a 2' by 2' section at a time. Master this and you are on your way to a brilliant shine!
RECOMMENDED PAINT POLISHING PATTERN
RECOMMENDED SPEED SETTING GUIDE
Remove Serious Defects – 5 to 5.5
Remove Swirl and Minor Defects – 4.5 to 5
Pre Wax Cleaning and Gloss Enhancement – 4.5
Protect your paint finish from harsh environmental elements – 2.5 Last Step Product Application - 2.5 to 3
Note: Not all paint finishes require the entire four-step process. Complete only the steps necessary for the condition or your paint finish.
CAR POLISHER TIPS AND TECHNIQUES
- Do a test spot! Make sure your technique and process is offering desired results before proceeding to polish the entire car
- Use the proper pad, polish and speed combination for your paint’s condition
- Keep the pad level on your paint surface at all times
- Always start with your least aggressive polish, then step up only if needed
- Use overlapping motions
- SLOW Down! Don’t run the machine over the paint too fast or it won’t get the job done
- Work a small (2’ by 2’) area at a time so you can concentrate on your work More polish is not better! Use only about 3 to 4 pea size dabs and add more as necessary
- Never dry buff! Add polish when you see your polish is thin and starts to go clear
- Never buff in direct sun or on a warm or hot surface Never use more than one type of polish on your polishing or buffing pad
- Keep your pads away from trim and sharp edges
- Tape off trim with painter's tape to avoid staining trim and polish build up in cracks and crevices
- Never lift your pad off the paint when the machine is turned on
- Keep the cord over your shoulder and away from your paint Tie a loose knot around where the extension cord meets the polisher cord so it stays plugged in
- Make sure your lighting is good so you can see your progress
- Apply medium pressure only when removing defects
- Check your work often to make sure your process is working